With all the questions about binding on some of the yahoo lists - I decided to put together a tutorial on how I do my binding - with smooth joins at beginning and end. I am making a quilt for my mother in law's 80th birthday - so here is how I put the binding on.

First of all I need to work out how much binding I will need. my quilt is 65 x 88 inches - add these two numbers together and multiply by 2 - this is the total perimeter of the quilt - it equals 306 inches.
My formula is:
Perimeter of quilt plus 12 inches (needed for mitering corners etc)
Perimeter of quilt divided by width of fabric = No. of strips (round up to the next whole number). Then .... Number of strips x 2.5 inches (width of strip) = total length of fabric needed.
65 + 85 x 2= 306 (perimeter of quilt) + 12inches spare = 318 inches.
my fabric was 70 inches wide (usually I use 42 inch fabric)
318inches divided by 70inches = 4.54 strips
So...I need to cut 5 strips from my fabric width at 2.5inches wide. That means I need a total of 12.5 inches in length of my fabric.
So I cut 5 strips of fabric 2.5 inches wide because this is the width I want for my quilt - you can do 2.1/4 if you want a finer binding or whatever width you choose - just make sure to use the correct measurement when doing your calculations.

Once the strips are cut - I put them right sides together and stitch on the corner angle.

This is a blue piece of fabric on tip so you can see a bit better.

Once you have all strips joined - fold in half with wrong sides together - iron flat.

When you get to a mitre iron open and then trim to 1/4 inch.


make sure that the open seam is sitting flat.

Fold in half and continue ironing.

Once I have all the binding ironed I need to pin it to the front side of the quilt.

I put the cut edge in alignment with the edge of the quilt and pin.

Pin until you get to a corner.

Then fold back the binding and finger press the fold.

Fold the binding back up on itself and finger press this fold.

I put two pins alongside each side of the little triangle fold to hold it stable.

Continue pinning until you get to the start again.

I put pins in on a 90 degree angle to mark where I want to sew from and to. I need to leave about 12 - 15 inches unsewn at the point where the ends meet as this is where I will do my end join.

So start sewing from the first 90degree angled pin at the start of the binding.

Sew right up to the first corner - right up to the pin that was put in the corner.

Turn the quilt as if you are to sew down the next side.
You then need to sew in reverse right off the quilt edge.


Pick up the little triangle fold and fold back on itself.

Put your sewing foot down and continue sewing down to the next corner - repeat for all corners.


Shadow Daisy Monk says this is taking too long! But will have a nap while she waits.

'
Stitch around until you get to the end of the binding - where you put the pin in vertically.
You should have quite a bit of binding left in the middle of this 12-15 inch unstitched space. This allows you to manouvre the binding to sew the ends together.

In the middle of this space - cut the left side piece of binding.
(make sure you have enough on the right side piece of binding to overlap this cut by about 3-4 inches. )

Take the right side piece of binding and smooth down so it is flat against the quilt. Then fold back on itself at the point where you cut the left side piece of binding.

Measure the rigth side binding from the fold - you will cut the excess binding off. The measurement here is 2.5inches - this is the exact same size as the width of my binding. (if you use a different size binding - you need to cut that width.)

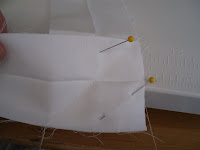
Then open out the right side binding face up and the left side binding face down. Right sides together put the edges neately together - as per the picture.

Pin as shown.

You need to stitch diagonally across the ends of the binding.
(As shown)
All stitched.

The b inding should fold naturally along the ironed fold line - Before you cut the excess fabric - make sure it sits nice and flat against the quilt with no excess binding and not too tight.

Trim to 1/4 inch and press seam open.


Fold the binding closed and finger press down.

Pin this section of binding down.

Sew the rest of the binding to the quilt - you should have a nice even binding - with no start end join being obvious as it will look just like a mitre join.

Fold the binding over to ghe back side of the quilt and pin. I pin it just past the sewing line that I made when sewing the front on.

Make sure you pin the corners with a neat and tight fold - time taken here will make the stitching easier. and give you a nicer corner.


Now I have pinned the binding to the back of the quilt - I am ready to hand sew it down.


+for+Chandra.JPG)


